
Need estimation?
Leave your contacts and get clear and realistic estimations in the next 24 hours.
Thank you! Your submission has been received!
Oops! Something went wrong while submitting the form.
.jpg "blog post cover")
Table of contentS
Every time a new online shop, information portal, or application you open needs registration, it feels overwhelming. In the best-case scenario, you only have to provide your mobile number and/or email address and come up with a password, while sometimes more steps may follow, requiring additional information. Eventually, you leave the site to avoid this registration mess. Sounds painfully familiar?
It gets a lot more painful when you are the product owner and user identification is a must-have component for your app. The key takeaway from such user behavior is that to avoid losing users at the onboarding stage, it’s important to realize the standards for user experience have shifted towards prioritizing faster and easier user journeys. Thankfully, OAuth 2.0 can help you with this. In this article, we explain how and describe the implementation of OAuth 2.0 using the Passport.js library.
OAuth stands for “Open authorization”, an industry-standard protocol designed to allow an application or website to access certain user data or act on a user’s behalf on platforms like Google, Facebook, Microsoft, Github, and others, without asking the user to share their password. Instead, OAuth makes use of access tokens issued by the authorization server to prove an identity between consumers and such identity providers. OAuth 2.0 is the latest version of the protocol aligned with today’s security standards. You can find out more about OAuth 2.0 protocol implementation in our blog.
In the above-mentioned use case, OAuth will not eliminate the registration process completely but will streamline it by auto-filling the basic information using data securely shared by platforms where the user has an account. It is important to differentiate between authorization and authentication and make it clear that the OAuth mechanism by itself does not provide identity proof.
In addition to simplified registration, other use cases with OAuth implementations include:
There are several key reasons why the OAuth 2.0 protocol is so widely used:
In this guide, we focus on implementing the 0Auth 2.0 protocol with Authorization Code grant type, Auth Code Flow. In this flow, the user exchanges an authorization code for an access token by client’s public and secret keys. Having a public key (client ID), we can handle and send it from the client side (browser).
.jpg)
The question is: how do we keep the secret key confidential and not compromise it? You’ll find this out in the implementation section below.
First, we should note that OAuth 2.0 requires an authorization server that can be integrated with different application types, including those that require web, custom mobile app development, or other solutions. As you can see in the above diagram, an authorization server is a key component in the OAuth flow, handling authorization requests from the client, integration with the resource provider platform, and authorization code exchange.
There are many ways to implement a custom authorization server using different programming languages and frameworks. In our use case, we chose to implement our auth server with Express.js – a Node.js framework that provides the toolset for quick and simple server start. Also, it is flexible, scalable, and integrates seamlessly with Passport.js for secure user authorization.
Passport.js is a Node.js middleware for authorization, offering a simple and modular approach. It supports various strategies for secure user authorization. If you search the oauth query on the list of Passport.js packages, you will get 49 results – for your own implementations or by different providers like Google, Azure, and GitHub. In this guide, we follow a general-purpose OAuth 2.0 strategy for Passport.js.
To start OAuth 2.0 implementation, you will need to get some data from your authorization provider, specifically:
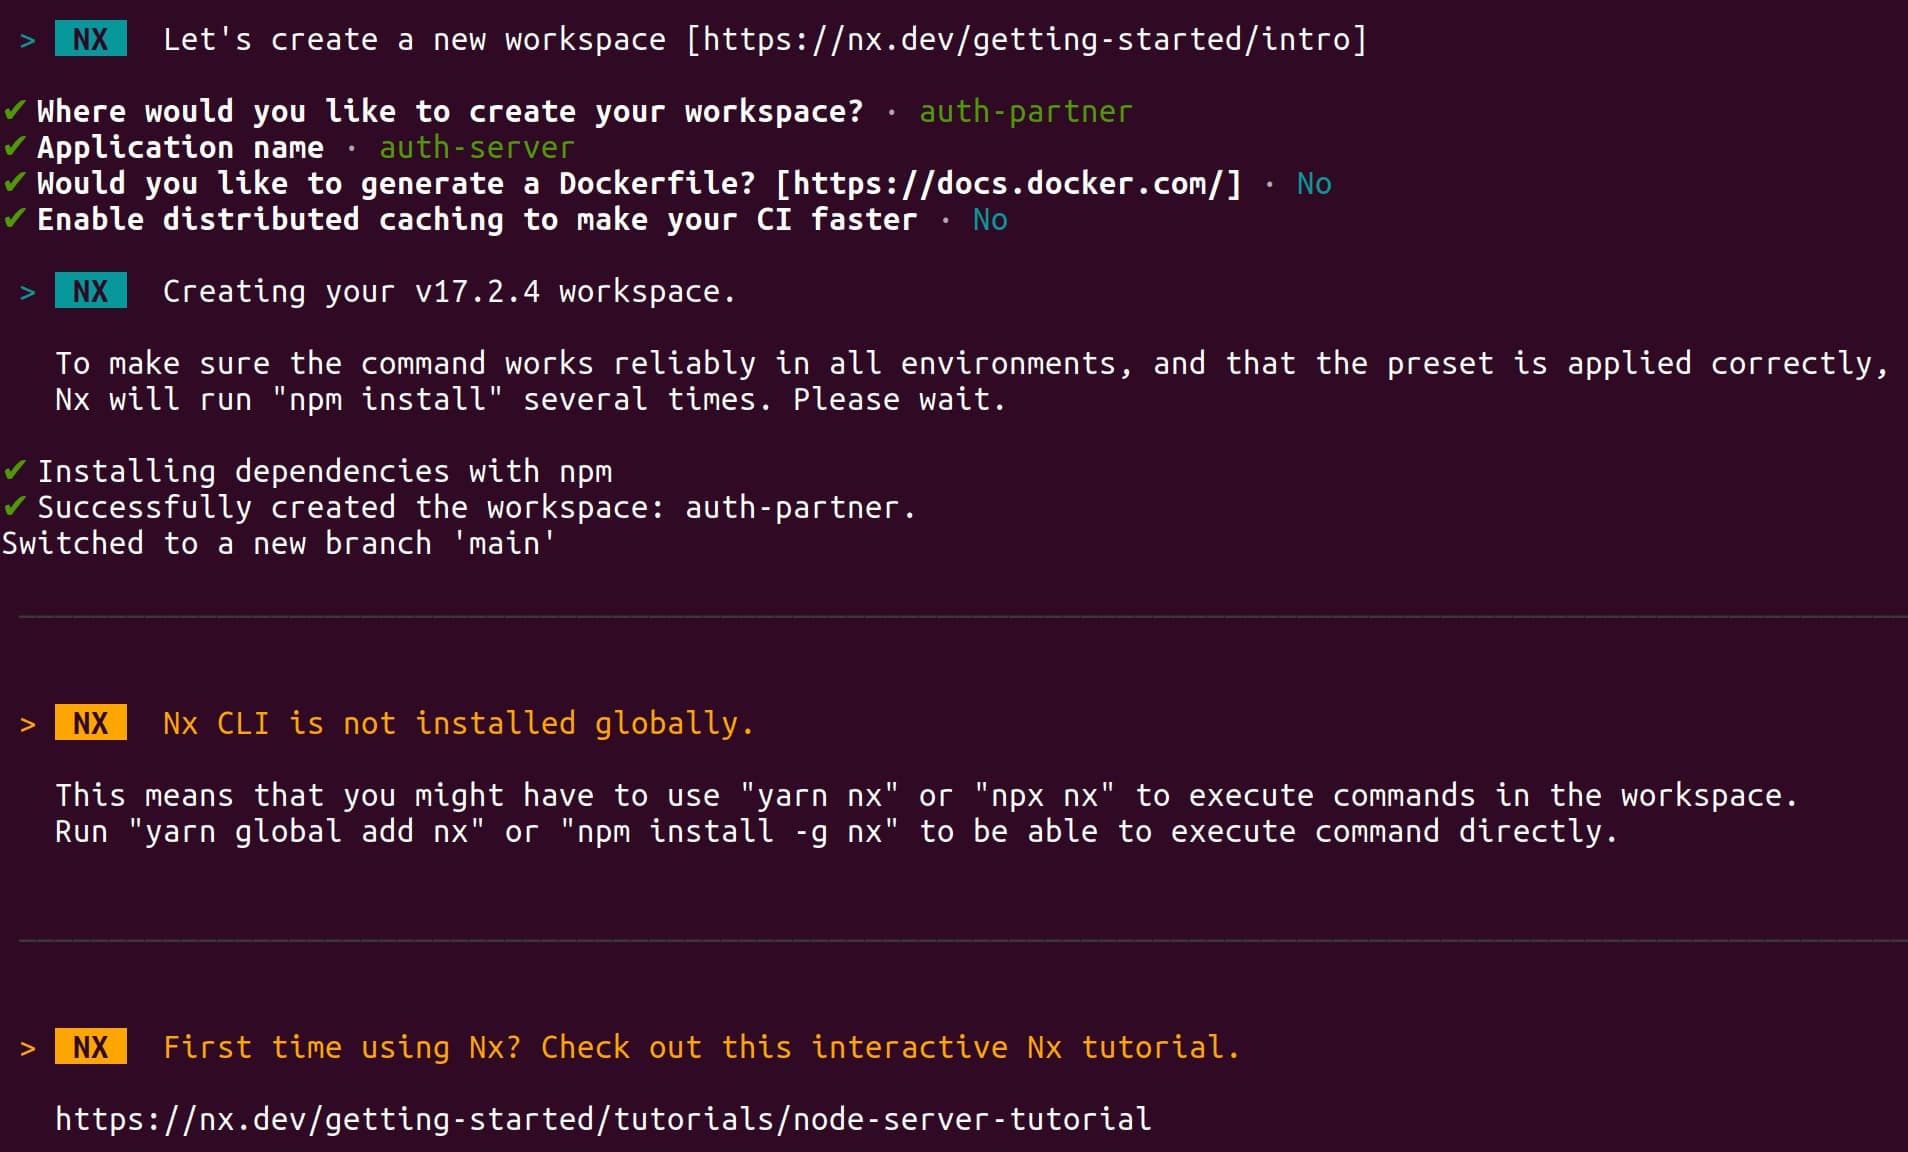
We start by creating a new Express.js application using the Nx build system or your preferred method. Navigate to a folder where you want to create a project (a new folder will be created) and run the following command in the terminal:
npx create-nx-workspace --preset=expressYou will have to give consent for workspace creation, then specify a folder name for the workspace (your project folder) and then a name for your application.
To proceed with authorization, install Passport.js along with the OAuth 2.0 strategy provider and packages for handling a session and cookies. If you know that your app and server will have different origins, you will need to install the CORS package to handle cross-origin requests.
Open the terminal in the project directory and run the following commands:
npm install passport passport-oauth2 express-session cookie-parser dotenv cors
npm install --save-dev @types/passport-oauth2 @types/express-session @types/cookie-parser @types/cors
Now you should have all the dependencies. You can also add a start script to run it with npm. After all manipulations, your package.json file should look like this:
{
  "name": "@auth-partner/auth-server",
  "version": "0.0.1",
  "license": "UNLICENSED",
  "scripts": {
    "start": "nx serve auth-server"
  },
  "private": true,
  "dependencies": {
    "axios": "^1.0.0",
    "cookie-parser": "^1.4.6",
    "cors": "^2.8.5",
    "dotenv": "^16.3.1",
    "express": "^4.18.1",
    "express-session": "^1.17.3",
    "passport": "^0.7.0",
    "passport-oauth2": "^1.7.0",
    "tslib": "^2.3.0"
  },
  "devDependencies": {
    "@nx/eslint": "17.2.4",
    "@nx/eslint-plugin": "17.2.4",
    "@nx/express": "17.2.4",
    "@nx/jest": "17.2.4",
    "@nx/js": "17.2.4",
    "@nx/node": "17.2.4",
    "@nx/webpack": "17.2.4",
    "@nx/workspace": "17.2.4",
    "@pmmmwh/react-refresh-webpack-plugin": "^0.5.7",
    "@svgr/webpack": "^8.0.1",
    "@swc-node/register": "~1.6.7",
    "@swc/core": "~1.3.85",
    "@types/express": "4.17.13",
    "@types/jest": "^29.4.0",
    "@types/node": "18.16.9",
    "@typescript-eslint/eslint-plugin": "^6.9.1",
    "@typescript-eslint/parser": "^6.9.1",
    "eslint": "~8.48.0",
    "eslint-config-prettier": "^9.0.0",
    "jest": "^29.4.1",
    "jest-environment-node": "^29.4.1",
    "nx": "17.2.4",
    "prettier": "^2.6.2",
    "react-refresh": "^0.10.0",
    "ts-jest": "^29.1.0",
    "ts-node": "10.9.1",
    "typescript": "~5.2.2",
    "url-loader": "^4.1.1"
  }
}
Now that the project is created, we can proceed with setting up Express.js, Passport.js, and its OAuth 2.0 strategy, and auth routes.
First, we configure the Express.js application. Remember that we will need CORS setup if your app and auth server are not on the same origin. Also, we will configure a session and cookies. Please, note that if you have HTTP protocol, then you don’t have to mess with ‘secure’ and ‘sameSite’. But we assume that the production stage will have HTTPS protocol, so this situation will be handled in the code. For that, let’s add some variables to the .env file:
# Environment stage: production considered safe (https)
NX_STAGE=development
# App port considered to be 80 on production environment
NX_APP_PORT=3333
# Session secret can be any string for your local memory store
NX_SESSION_SECRET="your-session-secret"
# Partner origin (needed for CORS origin)
NX_PARTNER_ORIGIN=http://localhost:4202
# Partner secret key (you can store it here or just hard-code)
NX_PARTNER_SECRET="partner-secret"
Next, we can proceed with a session and cookies. Open the app folder, and find the main.ts file in the src folder. Add some configurations with the app.use function:
import cookieParser from "cookie-parser"
import cors from "cors"
import express from "express"
import session from "express-session"

const app = express()

app.use(
  cors({
    credentials: true,
    origin: process.env.NX_PARTNER_ORIGIN,
  })
)

const isSecureEnv = process.env.NX_STAGE === "production"

if (isSecureEnv) {
  app.set("trust proxy", 1)
}

const sessionConfig = {
  secret: process.env.NX_SESSION_SECRET,
  saveUninitialized: true,
  resave: false,
  cookie: {
    secure: isSecureEnv,
    sameSite: isSecureEnv ? ("none" as const) : ("lax" as const),
    maxAge: 365 * 24 * 60 * 60 * 1000,
  },
}

app.use(cookieParser())
app.use(session(sessionConfig))
// Here passport.js code will be initialized later, then auth routes

// Listening section
const port = process.env.NX_APP_PORT || 3333
const server = app.listen(port, () => {
  console.log(`Listening at http://localhost:${port}/api`)
})
server.on("error", console.error)
Now, we can get down to initializing Passport.js with the OAuth 2.0 strategy.
Let’s set up a strategy for authorization code flow. We will tell Passport to use a state parameter to mitigate CSRF attacks. Passport.js handles state generation and validation automatically. Let’s have a look at the initialization process:
// previous imports
import passport from 'passport'
import OAuth2Strategy, { VerifyCallback } from 'passport-oauth2'

// session and cookies initialization

app.use(cookieParser())
app.use(session(sessionConfig))

// new lines to be added
app.use(passport.initialize())
app.use(passport.session())
passport.use(new OAuth2Strategy({
    // link to OAuth 2.0 provider's app that will request an authorization code
    authorizationURL: 'https://www.example.com/oauth2/authorize',
    // OAuth 2.0 provider's API endpoint where you exchange the code for a token
    tokenURL: 'https://www.example.com/oauth2/token',
    // Client ID (public key). Can be hard-coded, stored as .env variable or passed from app
    clientID: EXAMPLE_CLIENT_ID,
    // Client secret key. Can only be hard-coded or stored as .env variable. Do not expose.
    clientSecret: EXAMPLE_CLIENT_SECRET,
    // This is the route in your auth server app where passport will call auth callback
    // and initiate code for token exchange
    callbackURL: "http://localhost:3333/auth/callback"
    // Tell passport to handle and validate state parameter
    state: true,
    // if the api doesn't provide you with user profile, only access token, then you can skip it
    skipUserProfile: true
  },
  // verify function
  (
    accessToken: string,
    refreshToken: string,
    profile: unknown,
    callback: VerifyCallback,
  ) => {
    if (accessToken || profile) {
      // here you can either have a profile or not
      // if not, validate an access token, e.g fetch some data from API
      // then if you store users, you can create or find such user in DB
      // and finally call a callback and pass user as a second argument
      callback(null, user, { accessToken })
    } else {
      // handle error, pass it as first (error) or as third (info) argument
      // and false as a second argument (user)
      callback({ message: 'error' }, false)
      // or callback(null, false, { message: 'error' })
    }
  }
))

// Serialize and deserialize user
// you can use whole object or just user ID, for example
passport.serializeUser((user: object, done) => {
  done(null, user)
})

passport.deserializeUser((user: object, done) => {
  done(null, user)
})

// Listening section
After the strategy is serialized, we can use the Passport.js authorize function.
The biggest advantage of Passport.js is that it uses the same function for auth (code request) and its callback (exchange for token). Passport parses a request's query or body (depending on the request method) and if the code field is present, then it initiates token exchange (callback). Otherwise, it will initiate the authorization code request.
Passport.js will build all the query parameters by itself. If you enable state in strategy initialization, then Passport.js will add this parameter automatically to your authorization code request. The query for this request will look like this:
For the token exchange request, the query will look like this:
Please note, that you can also pass state as an optional field into the authenticate function. This custom state will be added to the request query. However, it will break state handling and validation by Passport, so if you don’t have any specific limitations or validations for the state string, you should avoid it and allow Passport.js to do the job. Otherwise, you have to create, store, and validate it by yourself; and don’t forget to disable the state inside the strategy because Passport.js will restrict you from obtaining an access token.
If you need to add some specific query parameters, you can override two functions for two requests. They take options from the authorize function as input.
OAuth2Strategy.prototype.authorizationParams = (options) => {
  return {}
}
OAuth2Strategy.prototype.tokenParams = (options) => {
  return {}
}
If you need to add some additional options to the Passport.js authorization options, you should perform the module augmentation for the passport’s AuthorizeOptions interface.
Finally, let’s proceed with authorization routes.
Use passport.authorize(), specifying the oauth2 strategy, to perform authorization requests. Let’s see the implementation for our Express.js application:
// Serialize and deserialize user
// you can use whole object or just user ID, for example
passport.serializeUser((user: object, done) => {
  done(null, user)
})

passport.deserializeUser((user: object, done) => {
  done(null, user)
})
// Routing section
app.get('/auth, passport.authenticate('oauth2'))

app.get('/auth/callback', (req, res, next) => {
  passport.authenticate(
    'oauth2',
    {
      // you can specify some options here or use the callback and keep options empty
      // failureRedirect won't trigger on error, only if this message is passed in info
      failureMessage: true,
      failureRedirect: '/error',
      successMessage: true,
      successRedirect: '/success',
      keepSessionInfo: true
      // if you will add a callback, then all these redirects won't work
    },
    (err: any, user: object | false, info: Record<string, any>) => {
      if (user) {
        // authentication was successful, let's proceed with login
        // Passport.js adds req.logIn function
        // by default, without custom callback, it is performed by passport.
        req.logIn(user, { session: true, keepSessionInfo: true }, (error) => {
          if (error) {
            // login was not successful
            console.error('Error on user login, error:', error)
          } else {
            // successfully logged in, perform your actions here
           // use access token from info and/or perform redirect
          }
        })
      } else {
        // No user data was obtained
        console.error(
          'Error on auth callback, error:',
          err ?? info?.['messages']?.join(' ') ?? 'Unknown error',
        )
        // handle error here, redirect or any other action
      }
    }
  )
})

// Listening section
const port = process.env.NX_APP_PORT || 3333
const server = app.listen(port, () => {
  console.log(`Listening at http://localhost:${port}/api`)
})
server.on('error', console.error)
And just like that, we reach the finish line. The last thing to do is to pass the user data or accessToken to your application from your server. For example, you can set a custom httpOnly cookie with an accessToken and add a proxy request for getting user data from your provider.
Please, note that no sensitive information should be exposed in the request's query.
Using this approach, we helped one of our clients build an identity and OAuth provider platform. The key feature of the platform is anonymity: users can register on the platform and then use it to log in with other applications without identifying themselves. This way, they can share their preferences and interests to get personalized offers and content but avoid exposing their personal information. Find out more about this solution.
As experienced software developers, we’ve completed over 130 projects, almost each involving the integration of an authorization and/or authentication mechanism. We decided to accumulate and turn this expertise into a ready-to-use IAM component with essential auth functionality out-of-box. It helps us speed up product delivery for our clients, reducing their time to market and increasing our development capacity. Feel free to reach out for a free consultation and learn how your project can benefit from it.
In conclusion, implementing OAuth 2.0 with Express.js and Passport.js offers a robust solution for authorization, benefitting from Passport.js's automatic handling of various complexities like query parameters and state checking. This abstraction allows developers to focus on application logic. Another significant advantage of Passport.js is its extensive support for 49 strategies for OAuth, providing the flexibility to implement multiple strategies within a single Express.js app.
However, it's important to note some downsides, especially in the process of making customizations and dealing with errors. Customizing Passport.js for specific project needs can be tricky, requiring deep understanding and making it more challenging. Furthermore, the error handling mechanism in Passport.js is not as detailed, which may cause frustration during implementation and debugging.
Another aspect to consider is that if you want to utilize the "state" feature, you shouldn't override it in authorization parameters. Doing so can result in an authentication error, adding an extra layer of complexity to the implementation process. We recommend addressing experienced software developers to deal with such technical challenges. At Axon, we help clients analyze their product needs and restrictions and come up with tailored solutions and technology stacks.
All in all, Passport.js remains a valuable choice for OAuth 2 implementations, offering efficiency and versatility with its array of strategies. Developers should carefully weigh these advantages against potential challenges, considering the trade-off between ease of use and customization based on their project requirements and priorities.
In this case study, we outlined a basic OAuth 2.0 authorization process using Express.js and Passport.js. However, authorization is not connected to a database, and there's no mechanism for refreshing tokens. To enhance this example, we suggest:
Implementing these changes will fortify the OAuth 2.0 setup, adhering to best practices for user management and keeping the application secure.
OAuth 2.0 is a protocol that allows users to log into apps using credentials from other trusted services like Google or Facebook. It simplifies login processes and improves security by avoiding the need to create and manage separate passwords.
Passport.js provides ready-to-use strategies that make it easier to integrate OAuth 2.0 authentication. It handles the complex parts like redirecting users, managing tokens, and verifying identities with minimal code.
Challenges include securely managing access tokens, handling different OAuth providers’ flows, and maintaining session security. Using well-maintained libraries like Passport.js and following best practices for token storage can help overcome these issues.
Free product discovery workshop to clarify your software idea, define requirements, and outline the scope of work. Request for free now.


[1]

Head of Engineering

Head of Java Chapter
[2]
Leave your contacts and get clear and realistic estimations in the next 24 hours.